
Delia stared at the mountain of greasy pans in her sink, feeling that familiar wave of kitchen defeat wash over her. After hosting Thanksgiving dinner for twelve family members, her once-pristine cookware looked like a war zone. The roasting pan still had stubborn turkey drippings clinging to every corner, and her favorite skillet seemed permanently coated with what used to be her famous cornbread stuffing.
“There has to be a better way,” she muttered, reaching for the dish soap for the third time. Little did she know that the solution to her biggest kitchen headache was sitting right there in her spice cabinet – ordinary table salt.
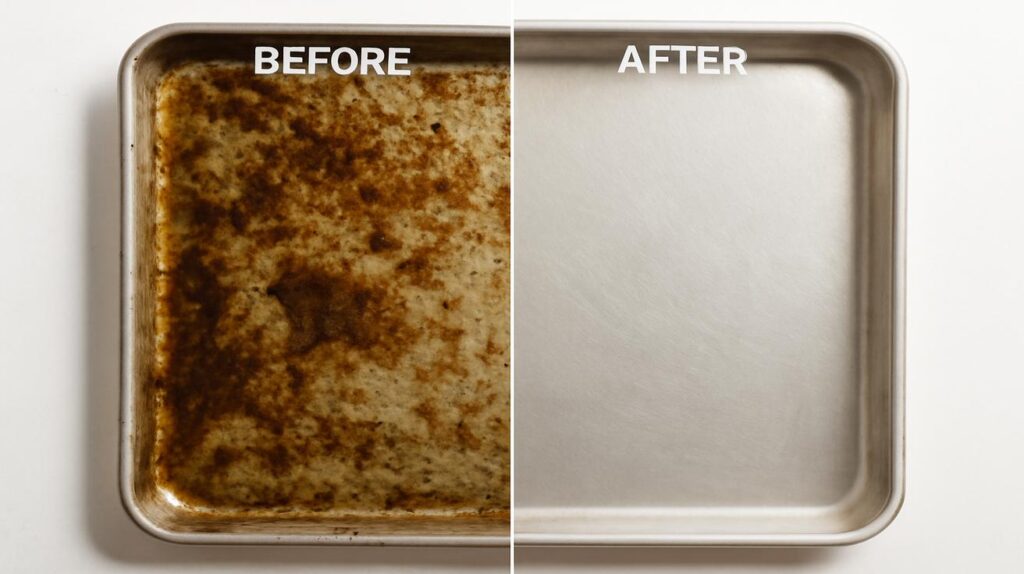
What happened next would change how she approached dishwashing forever, and it might just revolutionize your kitchen routine too.

The Simple Science Behind This Kitchen Game-Changer
Adding salt to your dish soap isn’t just some old wives’ tale – it’s a legitimate cleaning hack that transforms your regular dishwashing routine into a grease-fighting powerhouse. When you mix salt with dish soap, you’re creating an abrasive paste that tackles stubborn food residue while the soap handles the grease and grime.
The magic happens because salt acts as a natural scouring agent. Its crystalline structure provides gentle abrasion that helps break down stuck-on food without scratching your cookware. Meanwhile, the dish soap’s surfactants work to lift grease and oils away from surfaces.
The combination of salt and dish soap creates a perfect storm for cleaning. The salt provides mechanical action while the soap handles the chemical lifting of grease and food particles.
— Dr. Rebecca Martinez, Food Science Professor

This isn’t about replacing your regular dishwashing routine entirely. Instead, it’s about having a secret weapon for those moments when regular soap just isn’t cutting it. Think burned-on cheese, caramelized sugar, or that stubborn film that seems to laugh at your scrubbing efforts.
How to Use This Kitchen Hack Like a Pro
The beauty of this trick lies in its simplicity, but there are specific ways to maximize its effectiveness. Here’s everything you need to know about implementing this game-changing technique:
Basic Salt and Soap Method:
- Squeeze a generous amount of dish soap directly onto the dirty surface
- Sprinkle coarse salt over the soap (about 1-2 tablespoons for a large pan)
- Let the mixture sit for 5-10 minutes to penetrate stubborn residue
- Use a sponge or cloth to scrub in circular motions
- Rinse thoroughly with hot water
Best Salt Types for Different Cleaning Jobs:
| Salt Type | Best For | Abrasion Level |
| Table Salt | Delicate surfaces, non-stick pans | Gentle |
| Kosher Salt | General cleaning, most cookware | Medium |
| Coarse Sea Salt | Cast iron, heavily soiled pots | Strong |
| Rock Salt | Outdoor grills, extreme buildup | Very Strong |
I’ve been using this trick for twenty years in professional kitchens. It’s especially effective on stainless steel and cast iron when you need that extra scrubbing power.
— Chef Antonio Rodriguez, Culinary Institute Graduate

When This Trick Becomes Your Kitchen Lifesaver
Not every dish requires the salt treatment, but certain situations make this hack absolutely essential. Knowing when to deploy this technique can save you hours of frustrating scrubbing and protect your cookware from damage.
Burned-on food is where this method truly shines. Whether it’s caramelized onions that went a bit too far or cheese that welded itself to your baking dish, the salt-soap combination breaks down these stubborn residues without requiring the aggressive scrubbing that can damage your pans.
Greasy residue from fried foods responds exceptionally well to this treatment. The salt helps break up the oil while the soap lifts it away, leaving your cookware spotless instead of perpetually slick.

This technique has saved me from throwing away so many pans over the years. What looks like permanent damage often comes right off with salt and soap.
— Jennifer Kim, Home Economics Instructor
Situations Where Salt and Soap Excel:
- Baked-on casserole residue that seems permanently attached
- Caramelized sugar from candy making or dessert preparation
- Protein buildup from grilling or roasting meat
- Starchy films from pasta water or rice cooking
- Oil stains on plastic containers and cutting boards
What Your Cookware Will Thank You For
Different materials respond differently to the salt and soap treatment, and understanding these nuances helps you get better results while protecting your investment in quality cookware.
Stainless steel loves this treatment. The salt won’t scratch the surface, but it will remove water spots, food stains, and that dull film that builds up over time. Your stainless steel pans will look like new again.

Cast iron benefits tremendously from this method, especially when dealing with stuck-on food. The salt helps maintain the seasoning while removing unwanted buildup. Just remember to dry thoroughly and apply a light oil coating afterward.
Non-stick surfaces require a gentler approach. Use fine table salt and light pressure to avoid damaging the coating. This combination can extend the life of your non-stick pans by removing the buildup that causes food to stick.
The key is matching your salt choice to your cookware. Aggressive salts on delicate surfaces can cause damage, but the right combination works wonders.
— Mark Thompson, Kitchenware Specialist

Glass and ceramic bakeware respond beautifully to this treatment. The salt removes baked-on stains without scratching, while the soap handles any greasy residue. Your Pyrex dishes will sparkle like they’re brand new.
Beyond Basic Dishes: Creative Applications
Once you master the basic salt and soap technique, you’ll start seeing applications everywhere in your kitchen. This isn’t just about dirty pans – it’s about transforming how you approach kitchen maintenance.
Cutting boards, especially wooden ones, benefit from occasional salt and soap treatment. The salt helps remove odors and stains while the soap sanitizes. Your garlic-scented cutting board will smell neutral again.

Coffee pots and tea kettles develop mineral buildup and stains that regular washing can’t touch. The gentle abrasion from salt combined with dish soap removes these deposits without harsh chemicals.
Even your sink itself can benefit from this treatment. Sprinkle salt around the basin, add dish soap, and scrub with a sponge. The results will amaze you – your sink will gleam like it’s brand new.
FAQs
Will salt scratch my non-stick pans?
Fine table salt won’t scratch non-stick surfaces when used gently, but avoid coarse salts and excessive pressure.

How much salt should I use with dish soap?
Start with 1-2 tablespoons of salt per generous squeeze of dish soap and adjust based on the mess you’re tackling.
Can I use this method on aluminum cookware?
Yes, but use table salt only and avoid letting the mixture sit too long, as salt can cause pitting in aluminum over time.
Does the type of dish soap matter?
Any liquid dish soap works, but grease-cutting formulas enhance the effectiveness of this cleaning method.
How long should I let the salt and soap mixture sit?
Five to ten minutes is usually sufficient for most stuck-on food, but heavily burned items may benefit from longer contact time.
Is this method safe for daily use?
While safe, it’s best reserved for stubborn cleaning jobs rather than daily dishwashing to avoid unnecessary wear on your cookware.


Leave a Comment