
Thirty-year-old Priya stared at her reflection in the bathroom mirror, her alarm blaring in the background. Her hair looked like she’d been wrestling with her pillow all night—which, honestly, she had. With exactly seven minutes before she needed to dash out the door for her job interview, panic started creeping in.
Then she remembered the technique her hairstylist friend had shown her months ago. One hair elastic, three bobby pins, and forty-five seconds later, she was looking at a sleek, professional updo that could have taken her twenty minutes on any other day.
That interview? She got the job. And while her qualifications certainly mattered, walking in with confidence—partly thanks to knowing she looked put-together—made all the difference.

The Game-Changing Updo Technique That’s Taking Over
Creating an elegant updo doesn’t require a degree in cosmetology or an hour of your morning routine. The secret lies in working with your hair’s natural texture and using a technique that hairstylists call the “twist and tuck” method.
This isn’t about achieving red-carpet perfection. It’s about creating a polished look that works whether you’re heading to a business meeting, a dinner date, or just want to feel more put-together on a random Tuesday.
“The biggest mistake people make is trying to fight their hair’s natural movement. When you work with what you’ve got, even messy hair can look intentionally tousled and chic.”
— Marcus Chen, Celebrity Hairstylist

The beauty of this technique is its forgiveness. Second-day hair? Perfect. Slightly greasy roots? Even better—they’ll give you the grip you need. Hair that won’t hold a curl? This method doesn’t require any.
Your 60-Second Updo Roadmap
Here’s exactly what you need and how to make it happen, broken down into manageable steps that anyone can master:
| What You Need | Why It Matters |
|---|---|
| 1 hair elastic (preferably clear or matching your hair) | Creates the foundation without being visible |
| 3-4 bobby pins | Secures loose pieces and adds polish |
| Light-hold hairspray (optional) | Sets the style without stiffness |
| A texturizing spray or dry shampoo | Adds grip and volume to fine hair |
The step-by-step process is simpler than you think:

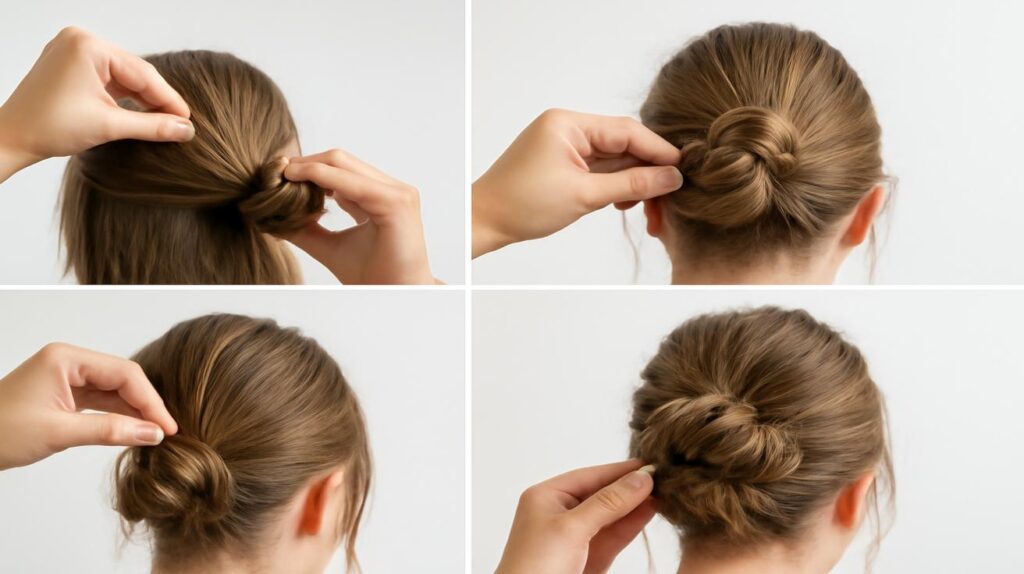
- Prep your hair (10 seconds): Give your roots a quick spritz of texturizing spray if your hair is fine or freshly washed
- Gather and twist (15 seconds): Pull your hair back into a low ponytail, but don’t pull it tight—leave it slightly loose for a softer look
- Create the base (20 seconds): Twist the ponytail and wrap it around the elastic, forming a loose bun
- Secure and adjust (15 seconds): Use bobby pins to anchor the bun and pull out a few face-framing pieces
“I tell my clients to think ‘effortlessly elegant’ rather than ‘perfectly polished.’ Those little imperfections are what make the style look intentional and modern.”
— Sofia Rodriguez, Salon Owner
Why This Works When Other Quick Styles Don’t
Most rushed hairstyles look exactly like what they are—rushed. This technique works because it mimics the natural way hair wants to fall when gathered up. You’re not forcing it into an unnatural shape or fighting against cowlicks and texture.
The loose foundation is key. When you create that slightly relaxed ponytail, you’re building in movement and softness that makes the final result look intentional rather than hurried.

For different hair types, small adjustments make all the difference:
- Fine hair: Use dry shampoo at the roots before starting, and don’t twist too tightly
- Thick hair: Section off the top layer, create the bun with the bottom section, then wrap the top layer around it
- Curly hair: Embrace the texture—your natural curl pattern will add beautiful dimension to the finished look
- Short hair: Focus on pinning sections rather than creating a traditional bun shape
“The trick is to stop trying so hard. Some of the most beautiful updos I’ve created happened when the client stopped overthinking and just let the hair do what it wanted to do.”
— David Kim, Editorial Hairstylist
Making It Work for Your Real Life
This isn’t just about having a good hair day—it’s about reclaiming those precious morning minutes and feeling confident when life throws you curveballs.

Think about how many times you’ve skipped events, avoided photos, or felt self-conscious because your hair wasn’t cooperating. Having a reliable go-to style eliminates that stress entirely.
The technique adapts beautifully to different occasions too. For work, keep it sleek and pin everything neatly. For a casual dinner, leave those face-framing pieces loose and let a few tendrils escape. For a formal event, add some sparkly bobby pins or a decorative hair accessory.
“My busy mom clients love this technique because it works whether they’re dropping kids off at school or heading into a board meeting. Versatility is everything when you’re juggling multiple roles.”
— Amanda Torres, Stylist

The best part? Once you master the basic technique, you can modify it endlessly. Braid the ponytail before twisting it. Create two smaller buns instead of one. Pin one side higher than the other for an asymmetrical look.
Practice makes perfect, but even your first attempt will probably look better than you expect. The forgiving nature of this style means that what feels messy to you often looks beautifully undone to everyone else.
FAQs
How do I make this updo work with very short hair?
Focus on pinning sections back rather than creating a bun, and use bobby pins that match your hair color to secure pieces around your ears and nape.

Will this style hold all day without hairspray?
Yes, especially if you have textured or second-day hair, but a light mist of flexible hold spray adds insurance without stiffness.
What if I don’t have bobby pins that match my hair color?
Clear elastics work great, and you can spray regular bobby pins with dry shampoo to make them blend better with lighter hair colors.
Can I do this on wet hair?
Slightly damp hair actually works well for this technique, but soaking wet hair will be too heavy and won’t hold the shape.

How do I prevent the bun from looking too tight or severe?
Gently tug at the hair around your crown and temples after securing the bun to create soft volume and avoid that slicked-back look.
What’s the best way to take this style out without damaging my hair?
Remove bobby pins first, then gently work the elastic out—never pull or yank, especially if your hair has tangled around the elastic.


Leave a Comment