The difference between perfectly juicy chicken breast and dry, disappointing meat often comes down to a single cooking technique that most home cooks never learn. Professional chefs rely on a method called “low-and-slow pan poaching” that makes overcooked chicken nearly impossible to achieve.
This gentle cooking approach abandons the high-heat methods that cause most chicken breast failures. Instead of blasting meat in hot pans or high-temperature ovens, the technique uses controlled, even heat to coax chicken to perfect doneness while keeping it moist throughout.
The method requires no special equipment, expensive ingredients, or lengthy preparation time. It’s a fundamental shift in how you approach cooking chicken breast—one that transforms this notoriously unforgiving protein into reliably tender results.

Why Traditional Chicken Cooking Methods Fail
Chicken breasts present unique challenges that make them different from other proteins. Their irregular shape—thick at one end, thin at the other—means uneven cooking times. The lean meat contains little fat to keep it moist during cooking.
Most home cooking methods work against these natural characteristics. High heat causes the outside to dry out before the inside reaches safe temperatures. Traditional pan-searing creates a race between achieving proper internal temperature and preventing moisture loss.
The chef technique addresses these problems by creating an environment where chicken can cook gently and evenly. Rather than fighting against the meat’s natural properties, this method works with them to produce consistently better results.

The Three-Step Chef Technique for Perfect Chicken
The professional approach breaks down into three essential steps that transform how chicken breast behaves during cooking. Each step serves a specific purpose in creating the ideal cooking environment.
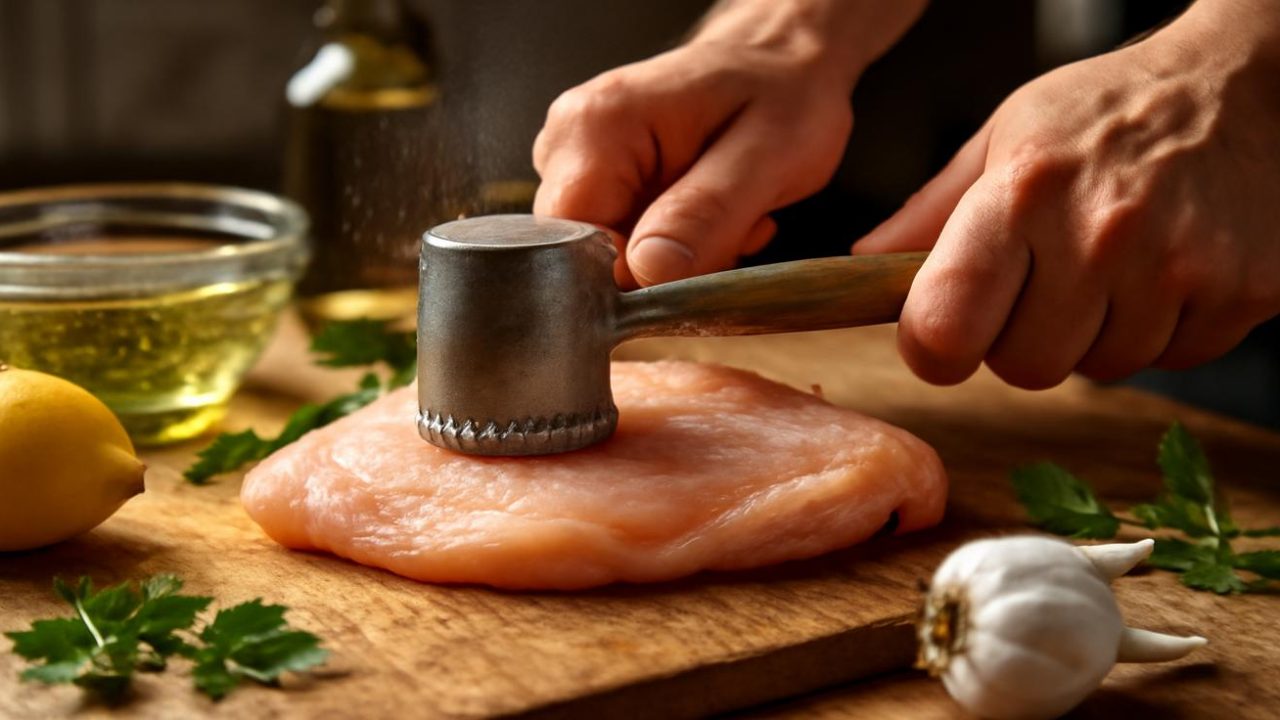
Step 1: Create Even Thickness
Place the chicken breast between parchment paper or inside a zip-top bag. Using a rolling pin, meat mallet, or sturdy skillet bottom, gently pound the meat to an even thickness of about 1.5 to 2 centimeters (roughly 3/4 inch).

This step eliminates the cooking time difference between thick and thin portions. When every part of the breast is the same thickness, every part cooks at the same rate. No more overcooked edges while waiting for the center to reach safe temperatures.
Step 2: Season Deliberately
Apply salt, black pepper, and desired seasonings evenly across all surfaces. Turn the chicken over and lift corners to ensure complete coverage. The goal is uniform seasoning that reaches every part of the meat.

Allow the seasoned chicken to rest in the refrigerator for 20-30 minutes if time permits. This resting period allows salt to penetrate the meat, improving both flavor and texture. However, the technique works even without this waiting period.
Step 3: Build the Shallow Poaching Bath
This final step creates the controlled cooking environment that prevents overcooking. The method sits between traditional frying and poaching, combining the best aspects of both techniques.

| Traditional Method | Chef Technique | Result Difference |
|---|---|---|
| High heat pan-searing | Gentle even heat | Moist throughout vs. dry edges |
| No liquid during cooking | Shallow flavorful bath | Continuous moisture vs. moisture loss |
| Constant monitoring required | Largely hands-off | Stress-free vs. timing anxiety |
| Easy to overcook | Nearly impossible to ruin | Consistent vs. unpredictable results |
How the Low-and-Slow Pan Poach Works
The shallow poaching bath creates two critical conditions that prevent chicken breast failure. First, it maintains gentle heat that won’t cause the exterior to dry out before the interior finishes cooking. Second, it bathes the meat in a flavorful mixture of fat and liquid that continuously adds moisture.
The cooking environment becomes self-regulating. The liquid prevents temperatures from climbing too high, while the fat carries flavors and helps conduct heat evenly. The chicken essentially braises in its own enhanced cooking medium.
This method allows the meat to “relax” during cooking rather than seizing up from high heat shock. Relaxed muscle fibers retain more moisture and develop better texture than proteins cooked under stress.

The technique requires minimal active cooking time. Once the poaching bath is established and the chicken added, the method becomes largely hands-off. This reduces the risk of overcooking from distraction or timing errors.
What This Means for Home Cooks
This professional technique makes chicken breast accessible to cooks who have struggled with dry, overcooked results. It removes much of the guesswork and timing pressure that makes chicken breast intimidating for many home cooks.
The method works with basic kitchen equipment found in most homes. No special pans, thermometers, or gadgets are required. The technique relies on understanding heat control rather than purchasing additional tools.

Meal planning becomes more reliable when chicken breast consistently turns out well. This protein’s versatility, affordability, and convenience make it valuable for busy households—but only when cooked properly.
The gentle cooking approach also provides more flexibility in timing. Unlike high-heat methods that can go from perfect to overcooked in seconds, this technique offers a wider window for achieving ideal results.
Mastering the Heat Control
Success with this technique depends on understanding what “gentle, even heat” means in practical terms. The pan should produce a quiet sizzle rather than aggressive bubbling or spattering. Visual cues help determine proper temperature.

The cooking liquid should maintain gentle movement without vigorous boiling. Small bubbles around the edges indicate appropriate heat levels. If the liquid becomes turbulent or the pan starts smoking, the temperature is too high.
Most home cooks initially set their burners higher than necessary for this method. The technique requires lower heat settings than typical meat cooking, which can feel counterintuitive at first.
Temperature control becomes easier with practice. Once you recognize the proper heat level, the method becomes as reliable as any other basic cooking technique. The key is patience and trust in the gentle process.
Frequently Asked Questions
How long does the low-and-slow pan poach method take?
The cooking time varies based on thickness, but properly flattened chicken breast typically takes 12-18 minutes using this gentle method.
Can this technique work with frozen chicken breast?
The chicken must be completely thawed first, as frozen meat won’t flatten evenly and will cook unpredictably in the shallow poaching bath.
What type of liquid works best for the poaching bath?
The source material mentions a flavorful mixture of fat and liquid but doesn’t specify exact ingredients for the poaching bath.
Do I need a special pan for this cooking method?
No special equipment is required—this technique works with standard home kitchen pans and basic cooking tools.
How do I know when the chicken is properly cooked?
The source material doesn’t specify temperature checking methods, but safe internal temperature for chicken breast is 165°F (74°C).
Will this method work for other cuts of chicken?
This specific technique is designed for chicken breast, though the gentle heat principles may apply to other lean cuts.


Leave a Comment